

For this tutorial, I will show you how to build a marketplace app using Next.js, Cosmic, and Stripe. After we are done, you will be equipped with a foundation to build your own projects using these powerful tools. Let’s get started.
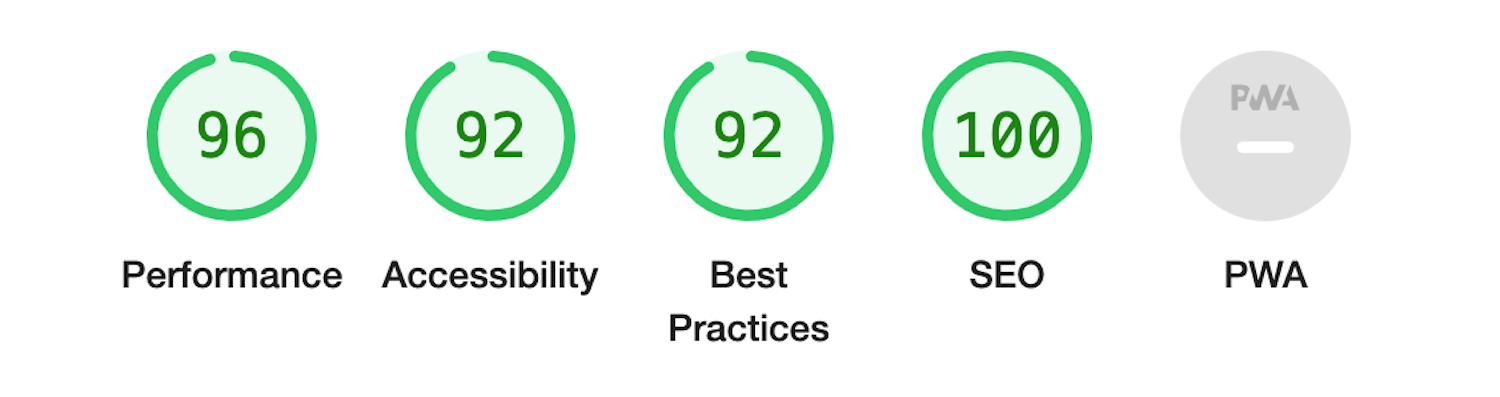
Bonus features include deploying to Vercel, dark and light mode and using Lighthouse to measure the performance of the website’s core web vitals metrics, which dramatically increases the user's experience and website visibility in SEO search results (this app's Lighthouse score displayed below).
 Guys, if you like it please upvote in Product Hunt.
Tools we’ll be using
- Next.js - scalable and high-performance React.js framework for modern web development. Provides a large set of features, such as hybrid rendering, route prefetching, automatic image optimization, and internationalization, out of the box.
- Cosmic - fast, fully managed headless CMS that enables us to quickly manage and create website content including UGC (user-generated content).
- Stripe - payments infrastructure that provides API tools to receive one-time and subscription payments.

TL;DR
First, we need to provide architecture and design
Designing is fundamentally about taking things apart, in such a way that they can be put back together. Separating things into things that can be composed that's what design is. — Rich Hickey.
MVC stands for model-view-controller software design pattern
Here's what each of those components means:
- Model: The backend that contains all the data logic. Cosmic Object Types (Multiple or Singleton) help us create dynamic, scalable data structures and the essence of their transformations is independent of the outer world.
- View (UI): The frontend or graphical user interface (GUI). For it, we use React, which is described as the “V” layer in the MVC.
- Controller: The brains of the application control how data is displayed. We use React’s Context API to decouple the state from the presentation View and facilitate business logic re-use.

MVC pattern is used for modern web applications because it allows the application to be scalable, maintainable, and easy to expand.
Setting up a project with Next.js
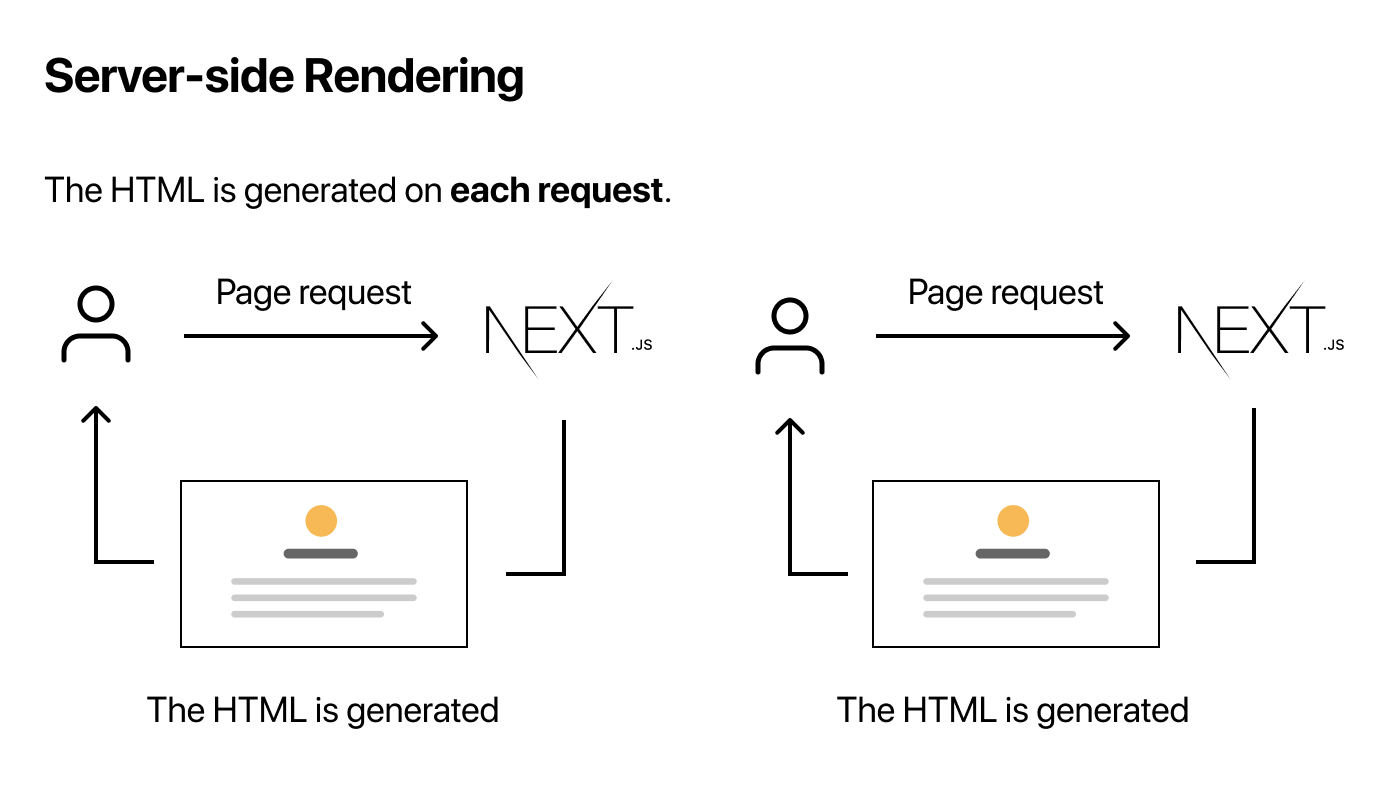
Next.js sets out to improve two things: developer and user experiences and is a complete toolkit to build blazing fast React apps. Next.js offers an abstraction that solves the most common, mundane, and complex tasks like routing, internalization, and image optimization. By default, Next.js pre-renders every page. This means that Next.js generates HTML for each page in advance, instead of having it all done by client-side JavaScript. Pre-rendering can result in better performance and SEO. Next.js has two forms of pre-rendering: Static Generation (SSG) and Server-side Rendering (SSR).
- Static Generation is the pre-rendering method that generates the HTML at build time. The pre-rendered HTML is then reused on each request.
- Server-side Rendering is the pre-rendering method that generates the HTML on each request.
In our project, we use Server-side Rendering for dynamic data and pre-render pages that will always be up-to-date.
To get started, we'll create a Next.js app that includes tooling and configurations. For this tutorial, you'll need Node.js 12.22.0 or a later version. Open the terminal, paste or type
npx create-next-app@latest unft-marketplace
# or
yarn create next-app unft-marketplace
Change into the new directory and install the dependencies using a package manager like npm, yarn, or pnpm and then start the app in the development mode:
cd unft-marketplace
npm install cosmicjs stripe @stripe/stripe-js sass

npm run dev
# or
yarn dev
To use the template UI you need to clone it on GitHub. Open the terminal, paste or type this code to install all dependencies, and run it.
git clone https://github.com/cosmicjs/unft-marketplace
cd unft-marketplace

npm install
#or
yarn install

npm run dev
#or
yarn dev
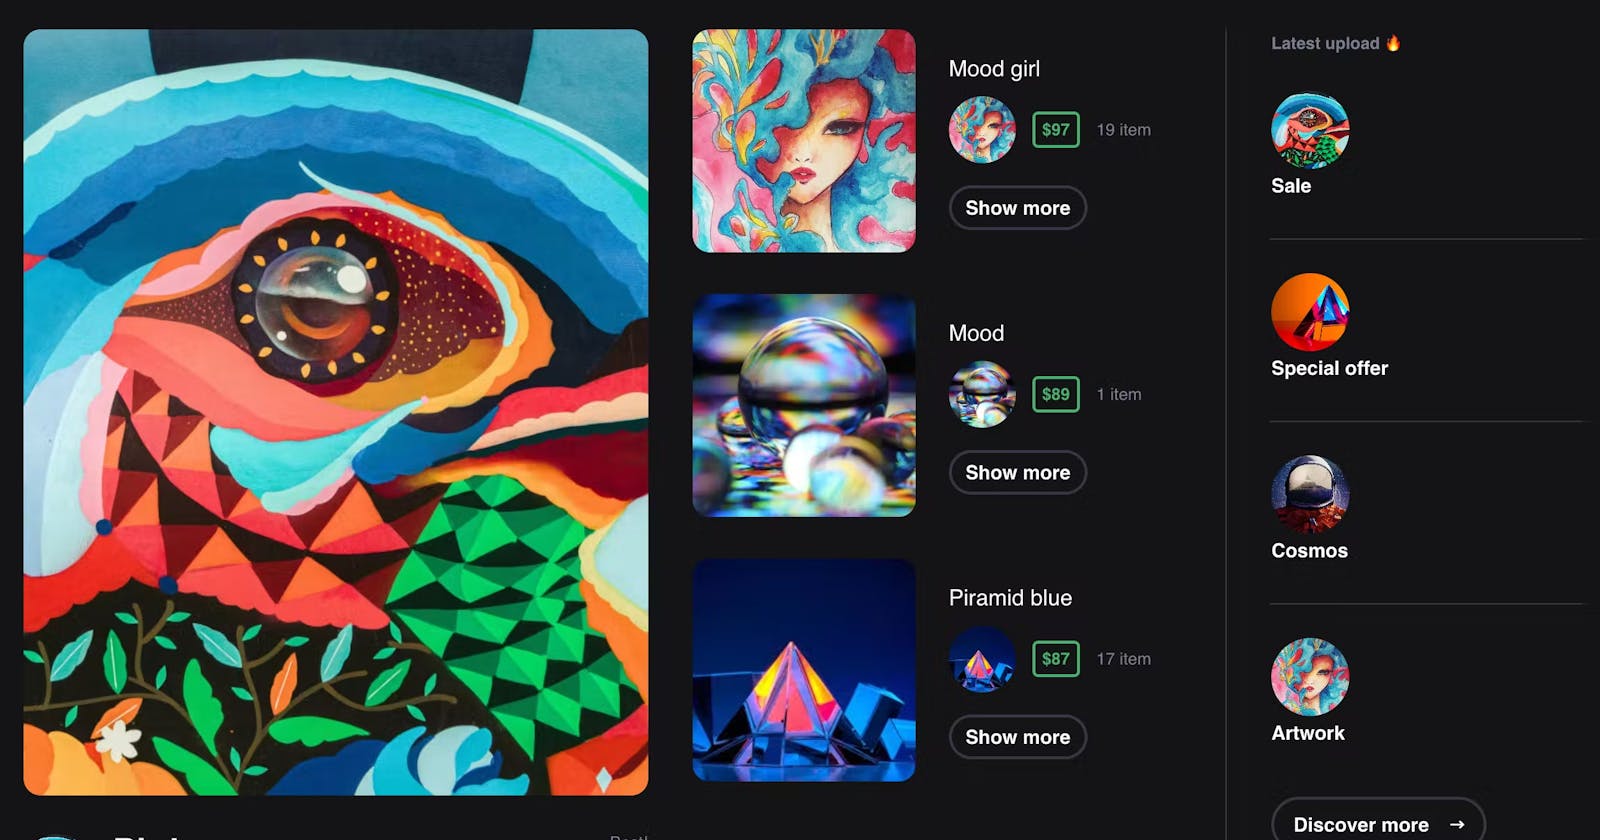
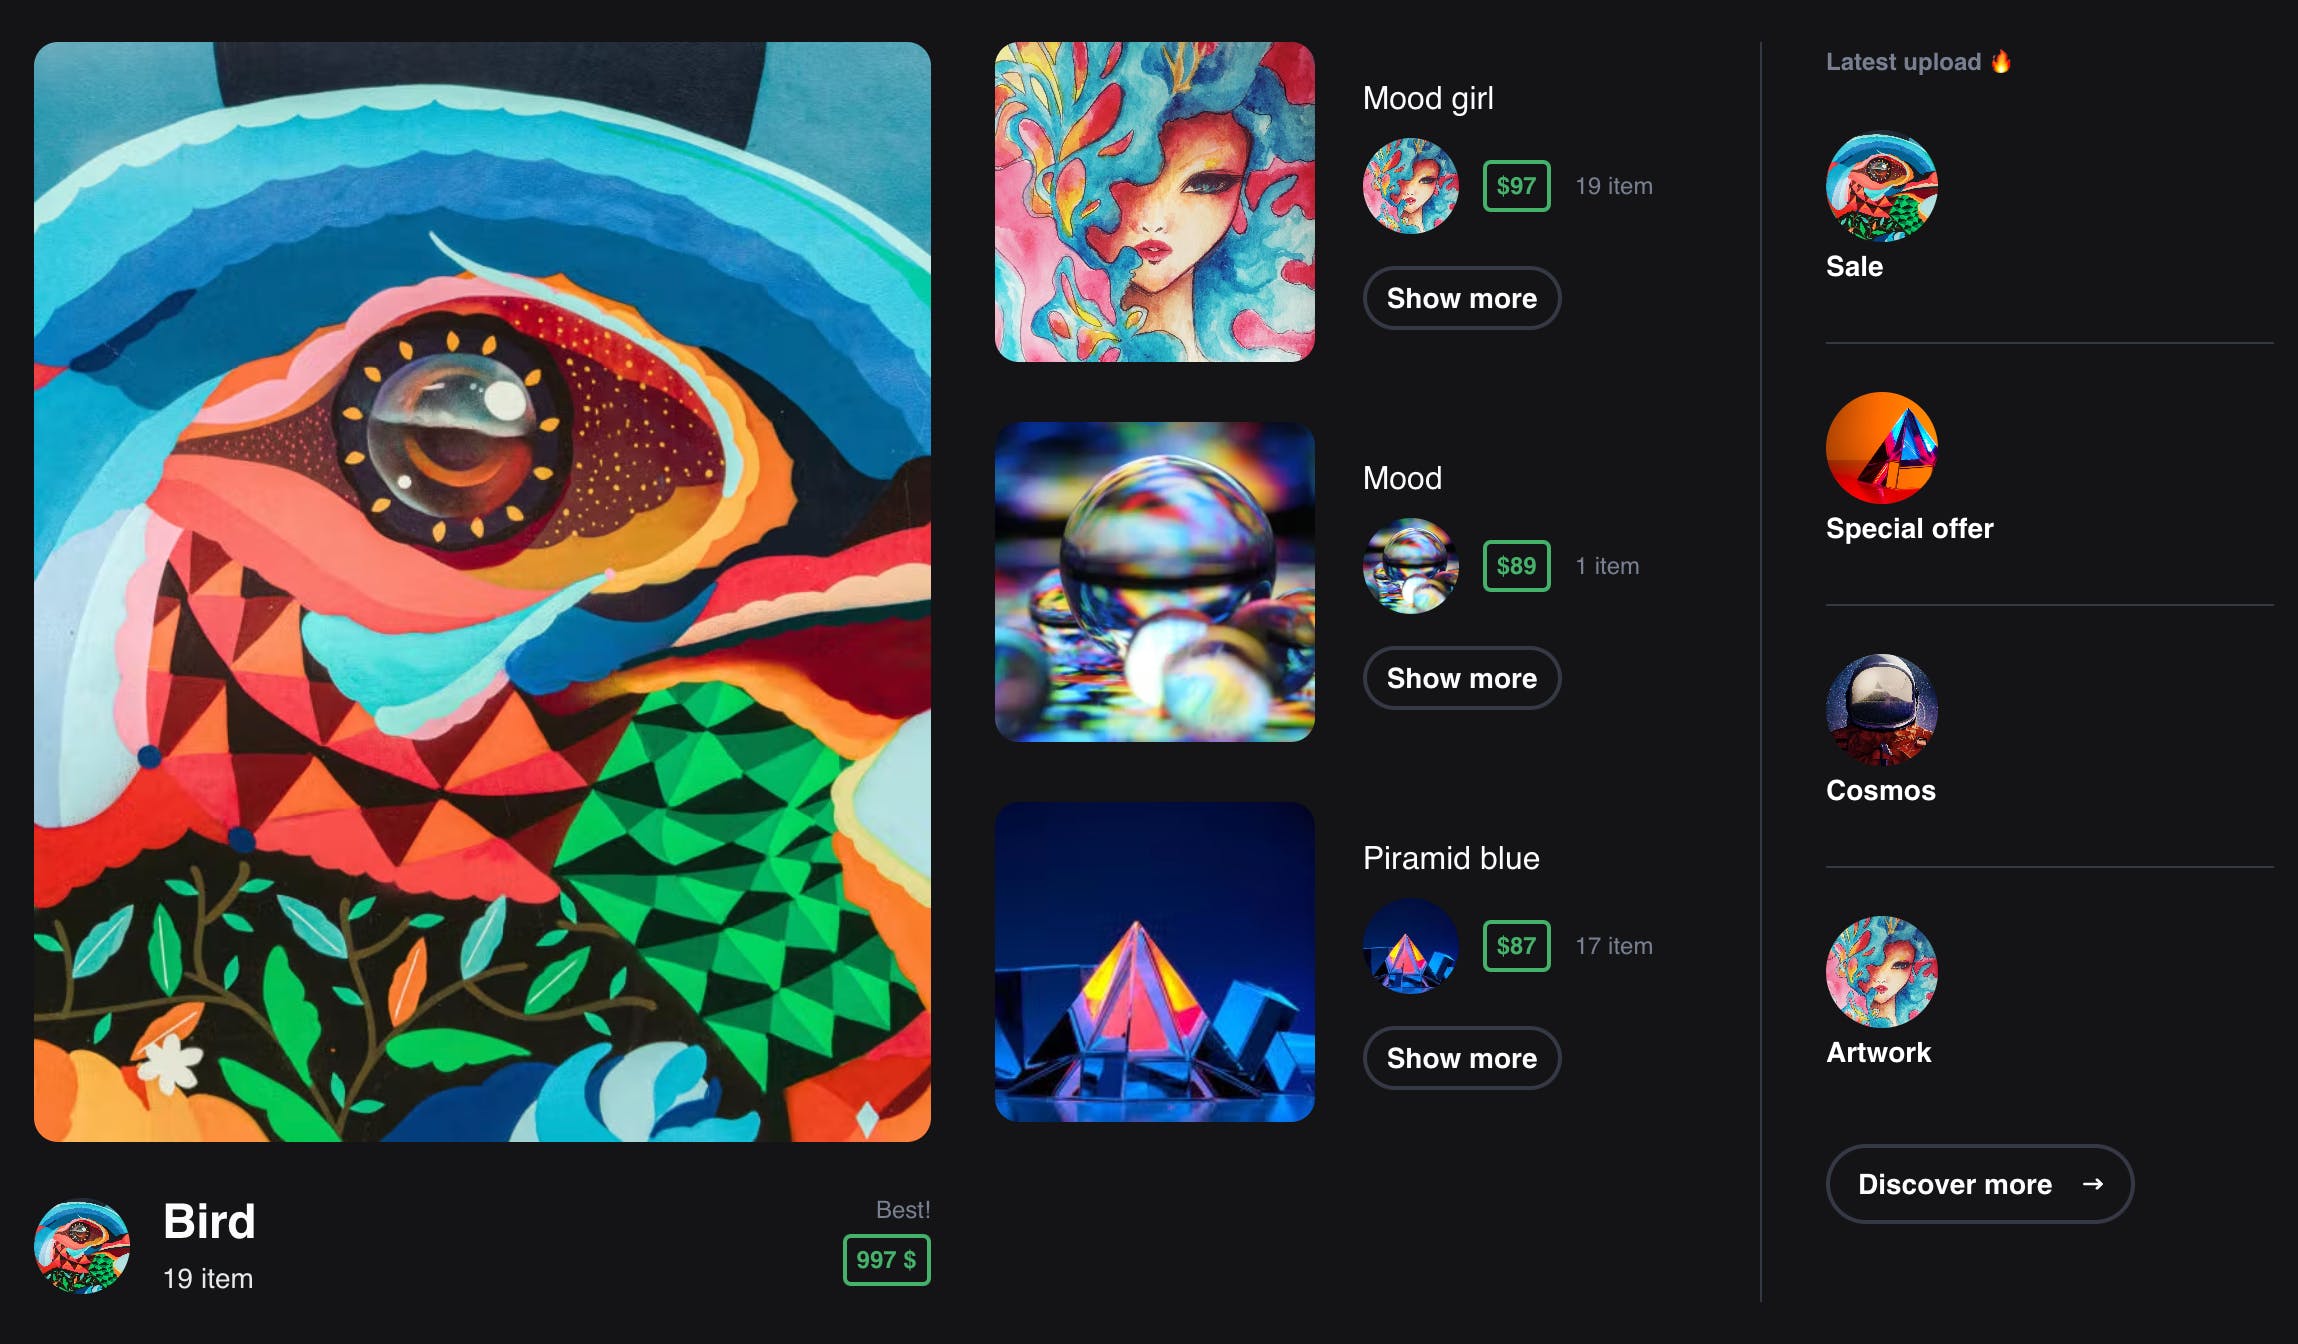
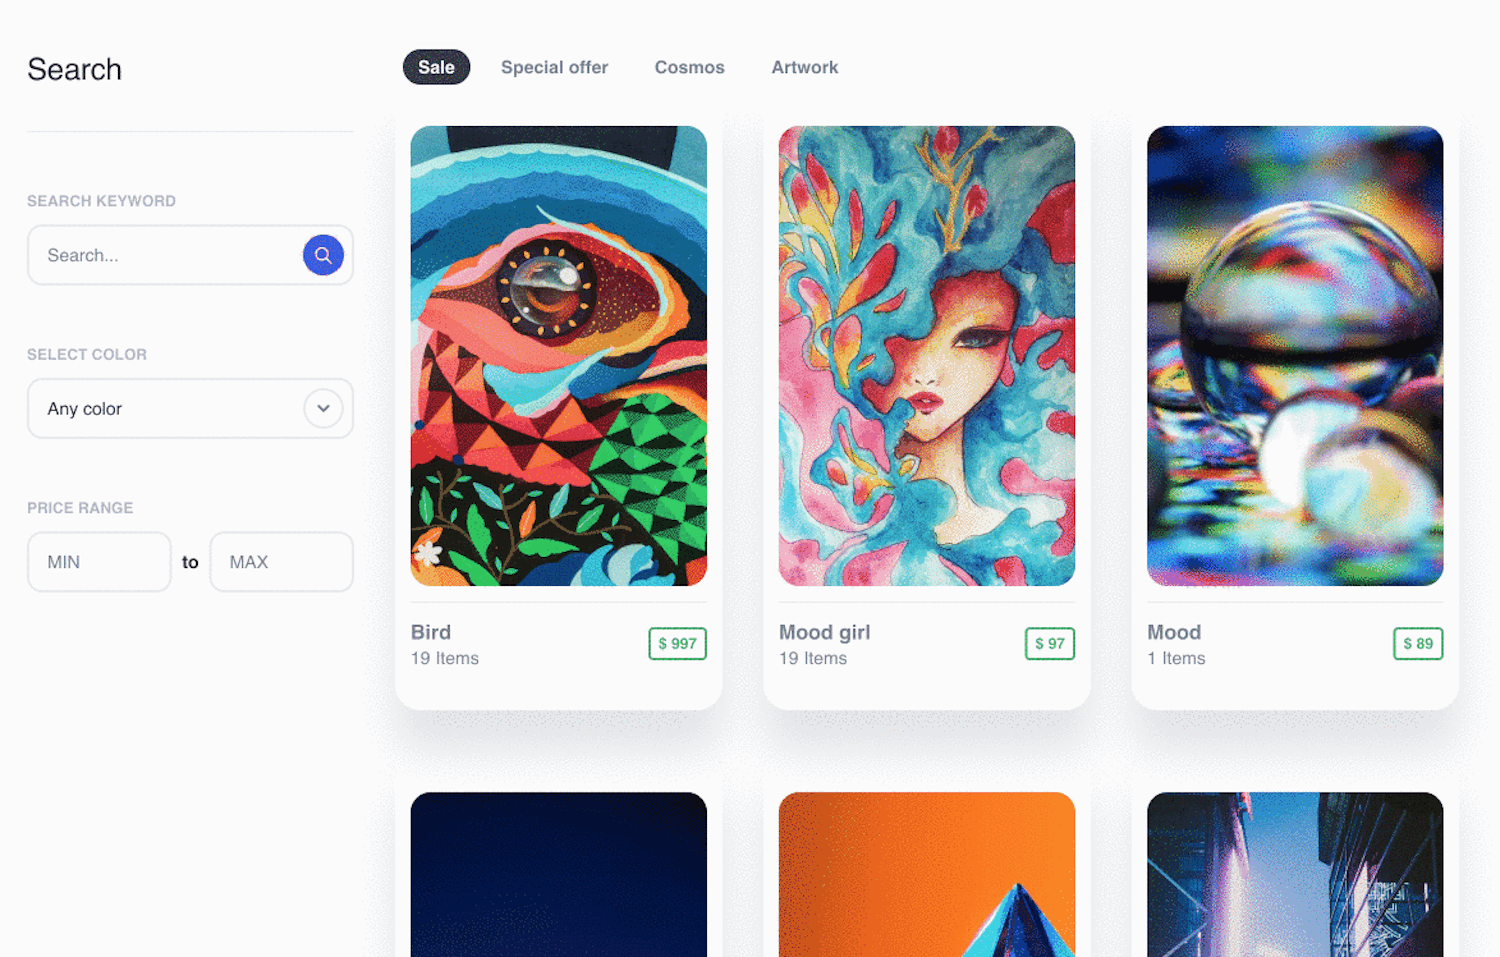
Open http://localhost:3000 in your browser to see the ascetic home page.
Managing API keys/secrets with Next.js
When working with API keys and secrets, we need to make sure we keep them secret and out of version control, while conveniently making them available as .env variables. You'll need to create a .env file at the root of the project. Log in to Cosmic and from Bucket Settings > API Access takes the following values:
NEXT_PUBLIC_COSMIC_BUCKET_SLUG=your_cosmic_slug
NEXT_PUBLIC_COSMIC_READ_KEY=your_cosmic_read_key
COSMIC_WRITE_KEY=your_cosmic_write_key

NEXT_PUBLIC_STRIPE_PUBLISHABLE_KEY=your_stripe_key
STRIPE_SECRET_KEY=your_stripe_secret_key
The NEXT_PUBLIC_prefix automatically exposes this variable to the browser. Next.js will insert the value for these into the publicly viewable source code at build/render time. Therefore make sure to not use this prefix for secret values! The same way log in to Stripe and for developers section take your keys.
Next.js API routes
Next.js API Routes to create API endpoints inside the Next.js app. They will be deployed as Serverless Functions (also known as Lambdas). In our case, for filtering Cosmic content by parameters we’ll create a file called filter.js in pages/api directory that has the following format:
//pages/api/filter
import Cosmic from 'cosmicjs';

const bucket = Cosmic().bucket({
// Set these values, found in Bucket > Settings after logging in at https://app.cosmicjs.com/login
  slug: '',
  read_key: '',
} )

export default async function filterHandler(req, res) {
  const { query: {min, max, color, category, search} } = req;

  let queryParam = {};

  if(typeof min !== 'undefined' || typeof max !== 'undefined') {
    queryParam = { ...queryParam, "metadata.price": {"$gte": typeof min !== 'undefined' ? Number(min) : 1, "$lte": typeof max !== 'undefined' ? Number(max) : 1000000000 },}
  }

  if(typeof color !== 'undefined') {
    queryParam = { ...queryParam, "metadata.color": color,}
  }

  if(typeof category !== 'undefined') {
    queryParam = { ...queryParam, "metadata.categories": category,}
  }

  if(typeof search !== 'undefined') {
    queryParam = { ...queryParam, "title": { "$regex": search, "$options": "i" },}
  }

  const params = {
    query: {
      ...queryParam,
      type: 'products',
    },
    props: 'title,slug,metadata,created_at',
  }

  try {
    const data = await bucket.getObjects(params);
    res.status(200).json(data);
  } catch (error) {
    res.status(404).json(error);
  }
}
Note that:
reqis an instance of http.IncomingMessage, plus some pre-built middlewares.resis an instance of http.ServerResponse, plus some helper functions.

Cosmic features overview and integration
Cosmic is a great headless CMS that enables us to model, manage, and store our content and media in a convenient hosted dashboard, then fetch our content using available API tools. The API provides search and filtering capabilities out of the box which makes building search and filter features in our app easy. Cosmic provides full modern functionality and features for creating interactive, independent, and dynamic websites.
Customizable API - Build out the schema, models, and controllers for the API from the admin dashboard. Cosmic offers both a REST and GraphQL API for our convenience. Webhooks - Call back anywhere you need, to get the functionality you want, out of the box. Queries - allow you to find the correct asset with your data by searching, filtering, and sorting. You can use some advanced queries to create more granular search capabilities. Add Media and Object - You can enable user generated content in your app using the Cosmic API. Users can upload and create interactive content within your defined data models. Cosmic is not only a fully-managed content management system, but the API can be used to create user-generated content experiences as well.
Getting started with Cosmic
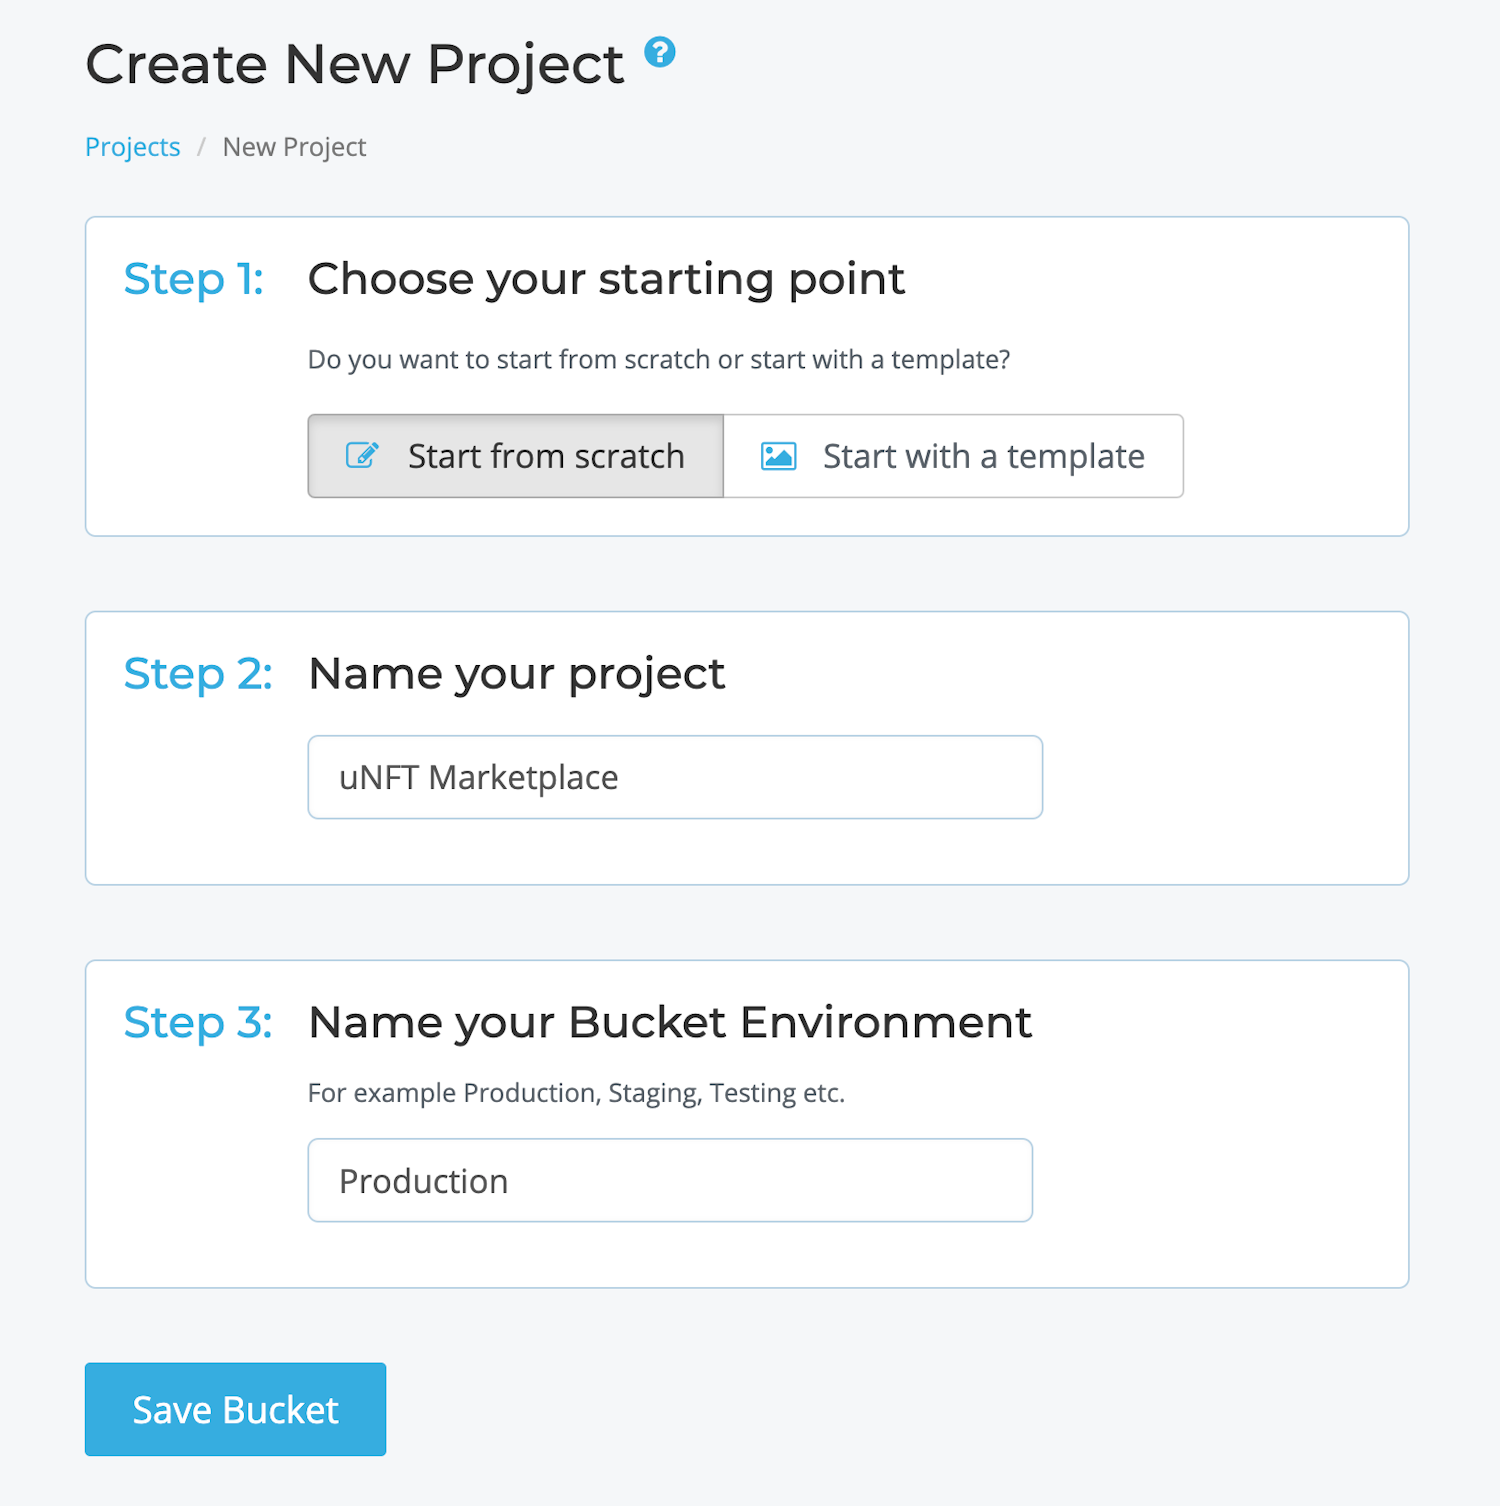
The first step is creating a free Cosmic account and a new Project. Let's select the "Start from scratch" option.
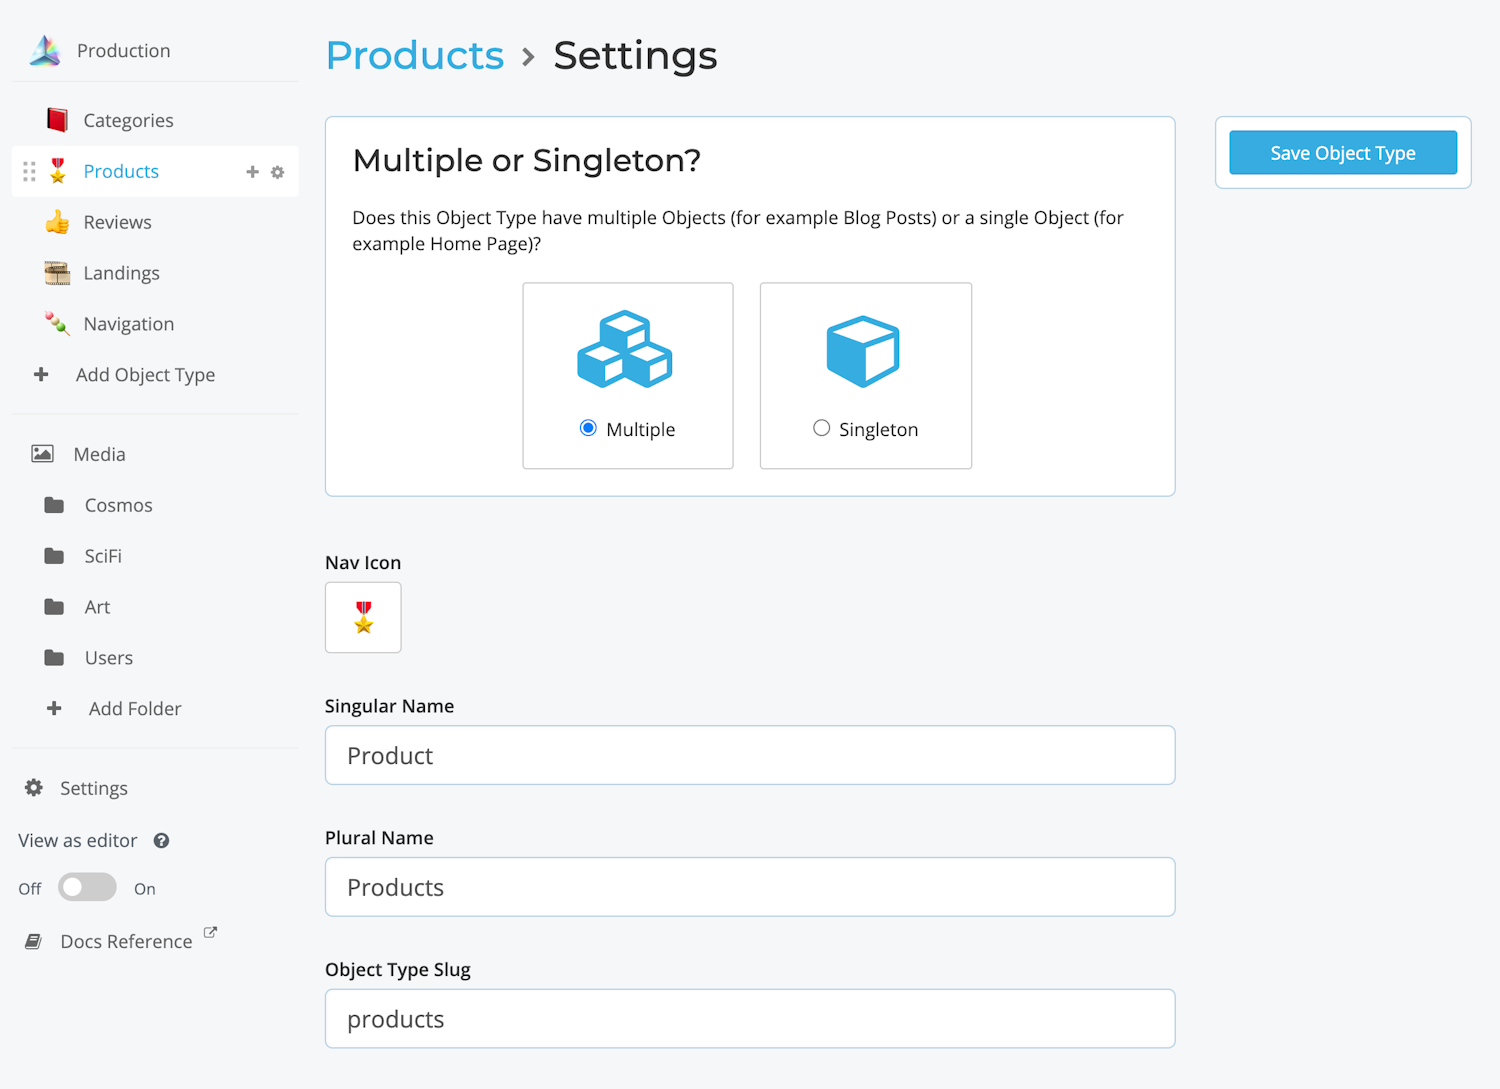
Cosmic Object Types (Multiple or Singleton) help us create dynamic, scalable, reusable data structures and our content model. Creating model sections, easy from scratch, defines the "Metafields" in the "Content Model". For a reusable model used across multiple Objects choose Multiple Object Type. For our project, we will create a reusable Products Object Type model using Multiple Object Relationships with Categories. This will enable us to add or remove Products to Categories and enable searching, and filtering by category.
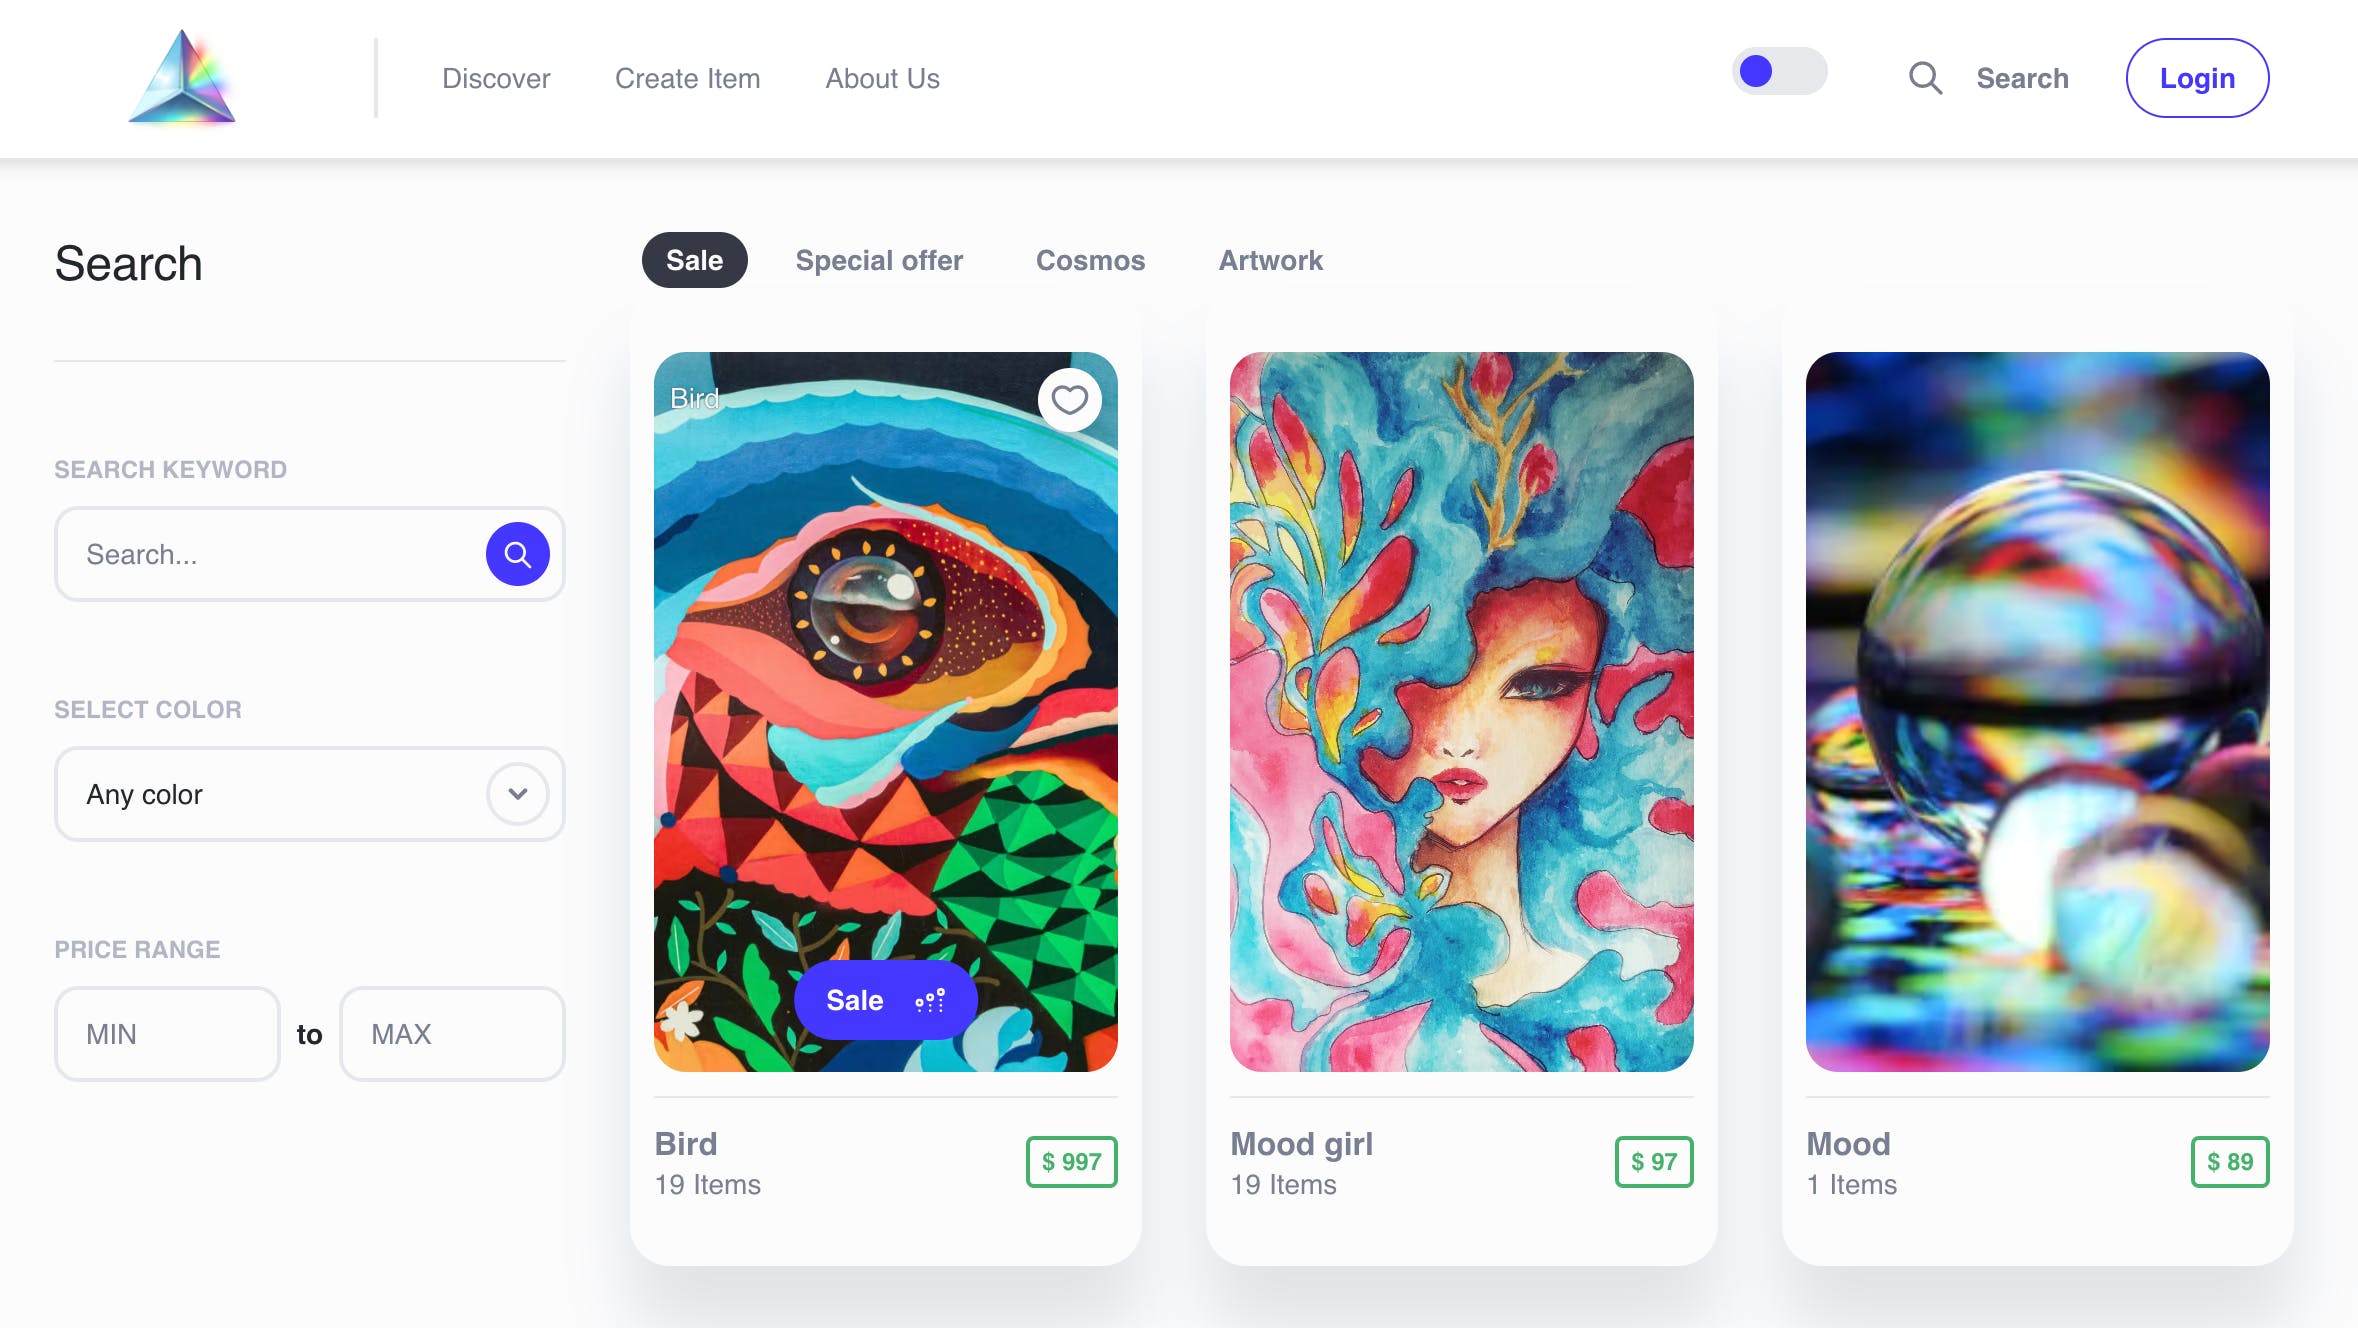
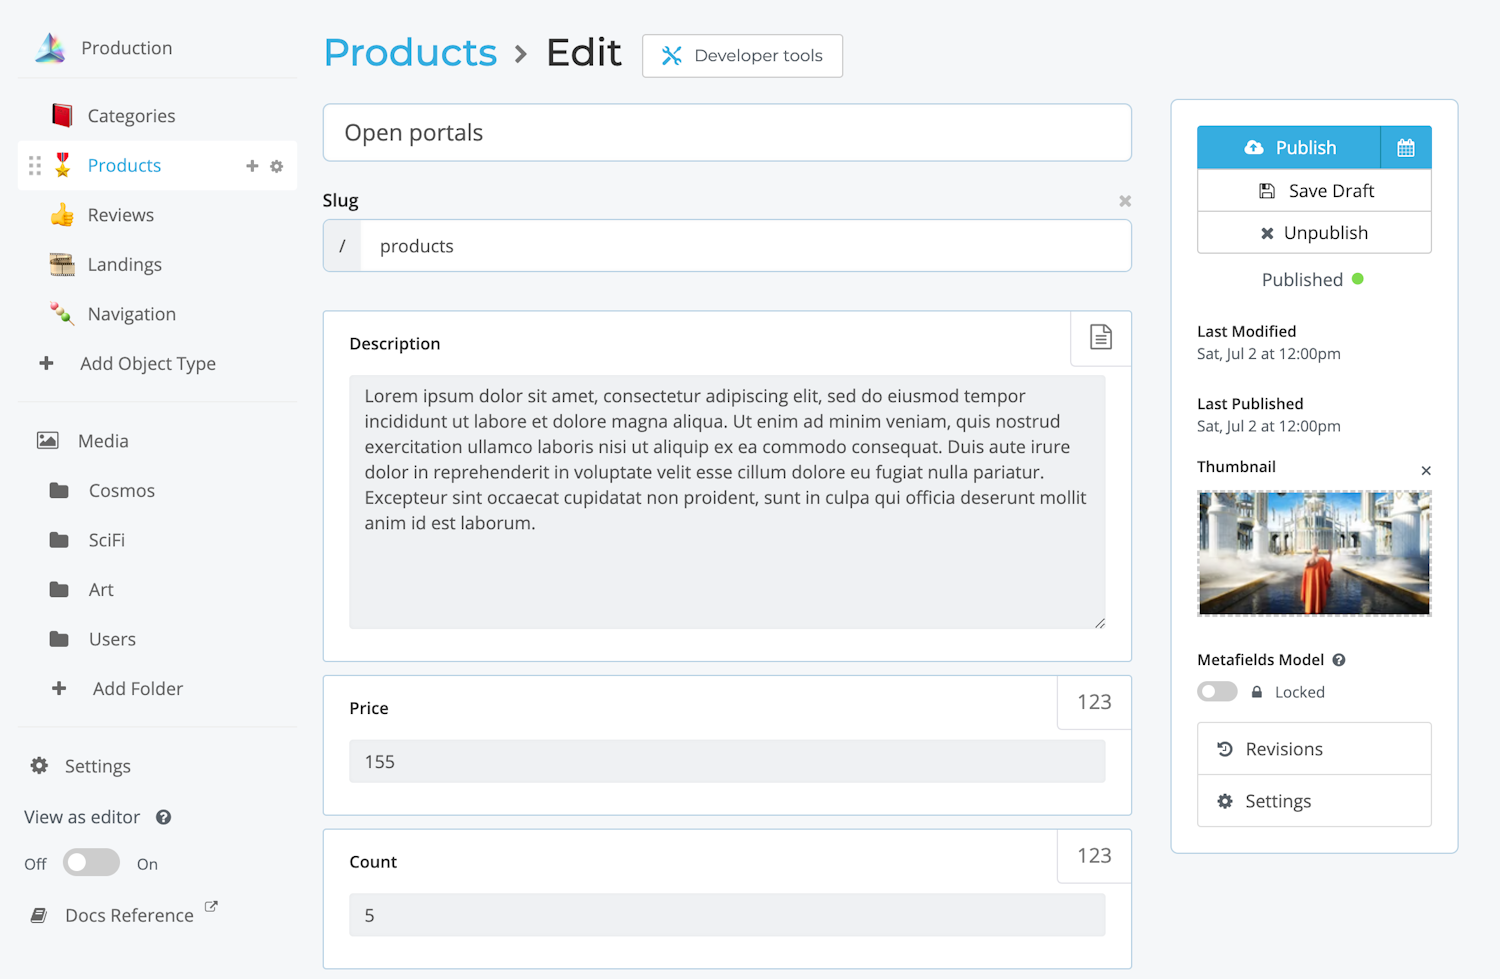
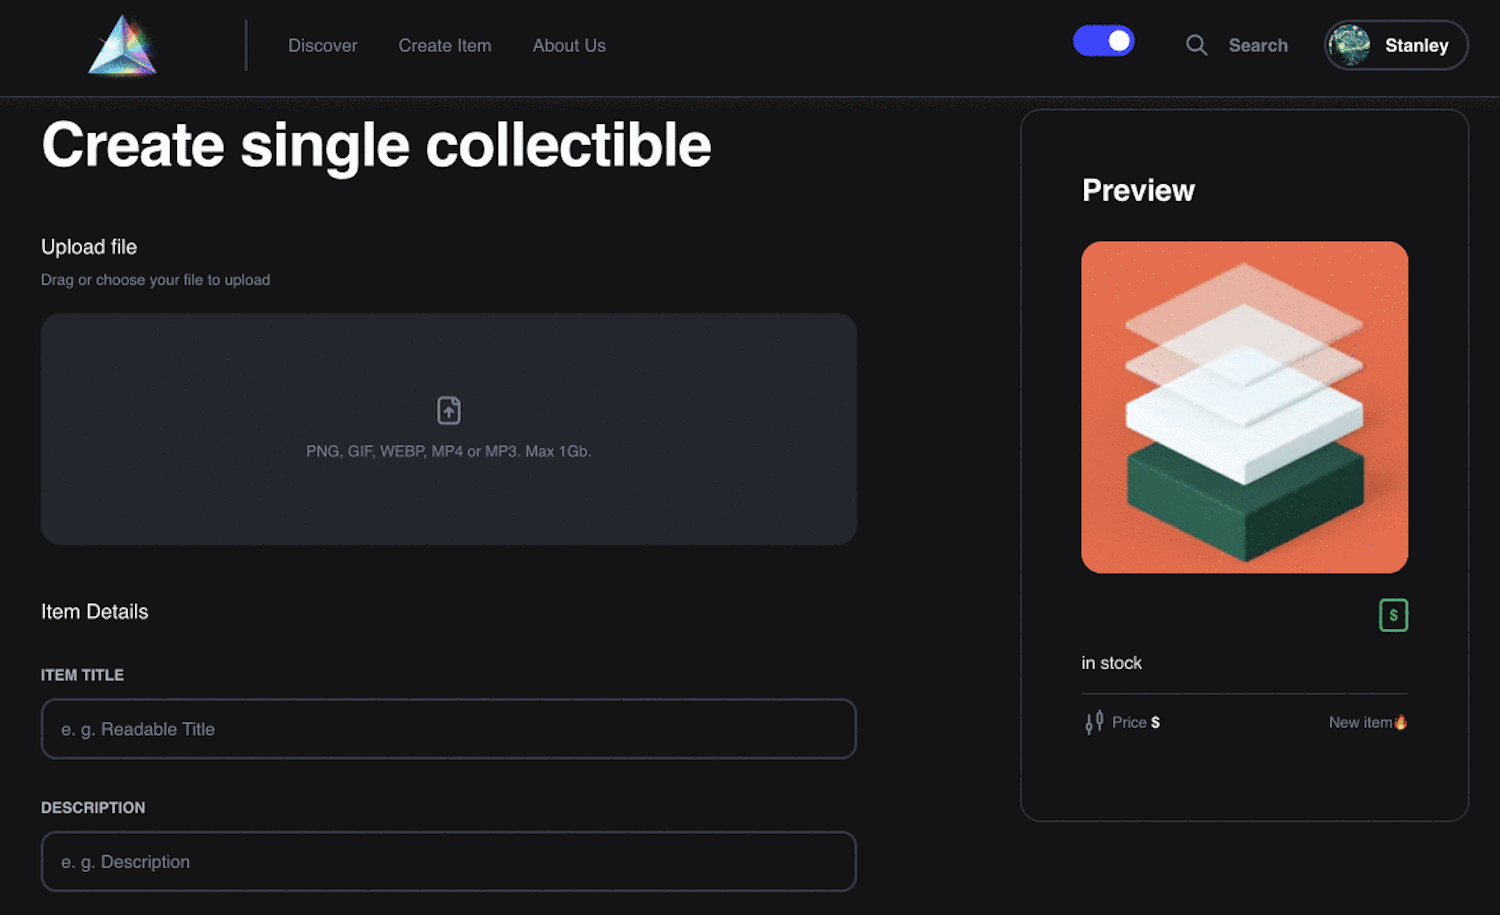
After creating the content model for our Products, you can begin adding Products from the dashboard like this:
You can define other content models by creating Object Types following this schema design:
- Singleton for a unique model,
- Multiple for reusable models.
Using Cosmic queries, you can quickly find the specific content according to search, filter, and sorting criteria.
User-generated content
Using the Cosmic capabilities to Add Media and Objects, logged-in users can upload and create their own form-submitted content. For our use case, the user can create new Products to add to the marketplace for sale.
Uploading files and dynamic content to Next.js requires API Routes as we will need to store secret keys securely in server-side environment variables. Here is a brief overview of how to upload files with React and Next.js API routes using formidable, fs, and the Cosmic bucket.addMedia method.
//api/upload.js
import Cosmic from 'cosmicjs';
import formidable from 'formidable';
import fs from "fs";

const bucket = Cosmic().bucket({
  slug: process.env.NEXT_PUBLIC_COSMIC_BUCKET_SLUG,
  read_key: process.env.NEXT_PUBLIC_COSMIC_READ_KEY,
  write_key: process.env.COSMIC_WRITE_KEY,
});

export const config = {
  api: {
    bodyParser: false,
  },
};

export default async function uploadHandler( req,res ) {
  const form = new formidable.IncomingForm({ multiple: false });

  try {
    form.parse( req, async ( err, fields, files ) => {
      if (err) return reject(err);
      const cosmicRes = await saveFile(files.file);
      res.status( 200 ).json(cosmicRes);
    } );

  } catch (error) {
    res.status(404).json(error.message)
  }
}

const saveFile = async ( file ) => {
  const filedata = fs.readFileSync( file?.filepath );
  const media_object = { originalname: file.originalFilename, buffer: filedata };

  try {
    // Add media to Cosmic Bucket
    const cosmic_res = await bucket.addMedia({
      media: media_object
    } );
    await fs.unlinkSync(file?.filepath);
    return cosmic_res;
  } catch (error) {
    console.log(error);
    return;
  }
};
Stripe overview and integration
Stripe provides a way to capture payments in your application. Much like Cosmic has done all of the heavy lifting for content infrastructure, Stripe provides the ecommerce infrastructure and tools to build delightful payment experiences for your customers, irrespective of the service or product being sold.

Due to PCI compliance requirements, the Stripe.js library has to be loaded from Stripe's servers. This creates a challenge when working with server-side rendered apps, as the window object is not available on the server. To help us manage that complexity, Stripe provides a loading wrapper that allows importing Stripe.js like an ES module:
//lib/getStripe
import { loadStripe } from '@stripe/stripe-js';

let stripePromise;

const getStripe = () => {
  if(!stripePromise) {
    stripePromise = loadStripe(process.env.NEXT_PUBLIC_STRIPE_PUBLISHABLE_KEY);
  }

  return stripePromise;
}

export default getStripe;
Stripe.js is loaded as a side effect of the import '@stripe/stripe-js' statement.
Create the Stripe checkout session
Add an endpoint on your server that creates a Checkout Session. A Checkout Session controls what your customer sees on the payment page such as line items, the order amount and currency, and acceptable payment methods. Also, you can enable or disable payment methods directly in the Stripe Dashboard.
//api/stripe
import Stripe from 'stripe';

const stripe = new Stripe( process.env.STRIPE_SECRET_KEY );

export default async function handler(req, res) {
  if (req.method === 'POST') {
    try {
      const params = {
        submit_type: 'pay',
        mode: 'payment',
        payment_method_types: ['card'],
        billing_address_collection: 'auto',
        shipping_options: [
          { shipping_rate: 'shr_1L4pafH6oGDppJjV9MrYC7z0' },
          { shipping_rate: 'shr_1L4pn4H6oGDppJjVBL7vPTk1' },
        ],
        line_items: req.body.map((item) => {
          const img = item.metadata.image.imgix_url;

          return {
            price_data: {
              currency: 'usd',
              product_data: {
                name: item.title,
                images: [img],
              },
              unit_amount: item.metadata.price * 100,
            },
            adjustable_quantity: {
              enabled:true,
              minimum: 1,
            },
            quantity: item.quantity
          }
        }),
        success_url: `${req.headers.origin}/`,
        cancel_url: `${req.headers.origin}/`,
      }

      // Create Checkout Sessions from body params.
      const session = await stripe.checkout.sessions.create(params);

      res.status(200).json(session);
    } catch (err) {
      res.status(err.statusCode || 500).json(err.message);
    }
  } else {
    res.setHeader('Allow', 'POST');
    res.status(405).end('Method Not Allowed');
  }
}
Next steps
Though this marketplace app is mainly a proof of concept to learn about these modern solutions, it is a good starter to build on. There is potential to add new features such as:
- User account page to display orders
- User profile page to show off purchased jpegs
- Comment system to capture reviews and conversations
- Bitcoin / Lightning option for making purchases
Conclusion
I hope you enjoyed this tutorial exploring how to use powerful API-first tools to build a full-featured marketplace application. This dynamic, functional, customizable, and fully integrated uNFT marketplace, powered by Next.js, Cosmic, and Stripe can be customized for other types of businesses as well. Please feel free to fork the code, and use it how you prefer!